It’s time to see what BuyItLive can do! When you’re ready to create a live sale, go to your store on BuyItLive and follow these steps to get started.
Connecting Your Page or Group
Before you start setting up your sale, you need to make sure the page or group you’re planning on selling from is connected to BuyItLive. To learn more about this process, read this article.
If you’ve already connected a page or group but are receiving an error message, then you’ve most likely missed a step in the connection process. Check out our article on Fixing an Invalid Connection to see a list of possible reasons for why your connection isn’t valid.
Getting Started

To start setting up your live sale in BuyItLive, log in to your account and go to the home page. Near the top of the screen, you’ll see the options to start either a “Live Sale” or a “Wall Drop.” After selecting “Live Sale,” you’ll be taken to your sale settings. To learn about the difference between live sales and wall drop sales, check out this article.
Name Your Sale
The name of your sale will allow you to differentiate between your sales. It will be seen by BuyItLive customer service, on your storefront, and on your Facebook post unless you edit the automatically generated description.
Select a Sale Type
For a traditional live sale, you’ll want to leave the “BuyItLive Streaming” option toggled off. If you plan to use a third party streaming service with Facebook or simply go live on Facebook as usual, the traditional live sale is a great option for you.
Will You Be Providing Shipping?
BuyItLive lets store owners choose between providing shipping and requiring customers to pick up their orders, or allow for both. Customers will select the option they want while they’re checking out.
To configure your shipping settings, click on “Settings” from the main page and then select “Shipping” (tab number 2). For more info, view our article on Shipping.
Select products for your sale:
Here you decide which products will be included in this sale. If you want to include everything in your inventory, then select “All Products.” If you want to pick and choose products, then select “Choose Products.” From here a dropdown menu will appear, allowing you to choose which products to include.
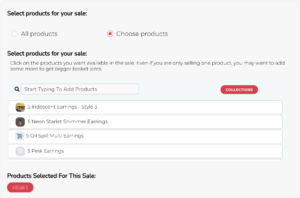
You can manually scroll and select products from your list of items or search the product names in the search bar. Click on the “Collections” button to scroll through products one collection at a time. As you select products, they will show up in a list directly below. You can also select “Use All Products In This Collection” to add an entire collection to your sale.
Hit “Reset” to remove all selected products and start over. Click on the check mark next to each added product to remove them one at a time.
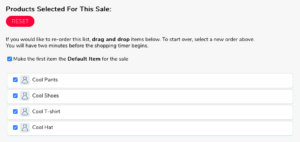
If you check the box next to “Make the first item the Default Item for the sale,” then that item will automatically show up in the cart of every customer who clicks on your checkout link.
How Long Should Items Stay In The Checkout Queue?
From here you will be able to set how long items can stay in the checkout queue. The default time is 60 minutes, but you can select anywhere between 2 minutes and 5 days. If a shopper’s timer runs out, the products in their cart are removed, leaving the next person in line a chance to claim them. Shoppers with an expired shopping cart will receive an email inviting them to “Restore Your Expired Shopping Cart.”
With a live sale, the timer begins once the live video is over. Feel free to take as much time as you want on camera – no one will be losing their carts
Other Sale Options (Live Sale Only)
The final section of setting up your sale includes four boxes you choose to check or leave unchecked. You cannot edit this section during a live sale.
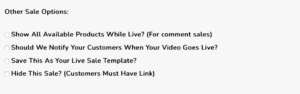
Show All Available Products While Live (For comment sales)
Checking this box will ensure that once a customer enters their cart during your live sale, they can add any products you’ve included in this sale. If you want to capitalize on viewer engagement, then leaving this box unchecked may benefit you as it forces customers to watch your live sale to hear product codes and add them to their cart. Once your live sale is complete, customers will be able to view all available products by following the link in your post description.
Should We Notify Your Customers When Your Video Goes Live?
If this box is checked, registered customers will be notified via email when you go live.
Private Sale – Invite Only
If you select this option, customers can only access your sale via a direct link.
BuyItLive Channel Only
This setting is only used with the BuyItLive Streaming Sale option.
What’s next?
Now that you’ve set up your sale, it’s time to post it! The “NEXT” button takes you to a page where we’ve generated a unique description you can include in your live description if you’d like. Copy the sale description and paste it in the description of your live video before going live on Facebook.
Do you sync with shopify?
Hi Leanne, yes we do sync with Shopify. You can check out any of our articles on Shopify integration to learn more.
Do you provide like captions/subtitle/overlay for our deaf/hard of hearing viewers?
Hi Halie, BuyItLive doesn’t currently offer an overlay. However, you can easily stream using another service that uses overlays during a BuyItLive live sale.
Does BuyItLive only work with Live sales? Or can I schedules posts and have customers comment as well?
Hi Kristina, BuyItLive works with both live sales and wall drops. You’re unable to schedule more than one post at a time, since our system doesn’t allow you to start setting up a new sale until the previous sale has connected or is deleted.
Hi im a single mom I’m an independent consultant with paparazzi just getting started selling and looking at other means of income from home im working on being mobile to travel is this easy to use any where on computer and cell phone can i use buyitlive for other businesses are there cost in volved and good help when needed thank you
Hi Tracy, the system is simple to use and you can sign in from any device that uses internet. Right now we have 2 subscription plans, BuyItLive Basic is $25 a month and BuyItLive Plus is $55 a month. If you have more questions, feel free to message our Facebook page.
In all the tutorials I see people holding up numbers, does the system allow the number/color/etc. to show at the top of the live sale like comment sold?
Hi Vontina, we don’t currently offer a screen overlay, but we will be adding it in the near future for Professional subscribers. Many of our sellers now use third-party programs like OBS and BeLive to include screen overlays.