In order to sell using BuyItLive, you’ll need to have your products uploaded to your store on our system. You have a couple different options for doing this, and we hope you’ll find one that works well for you. Everyone here at BuyItLive wants to see you succeed, so we try to make our system as simple as possible.
Item By Item
After logging in, go to the Products section of your BuyItLive account. Click the orange “+” button and you will see this interface.
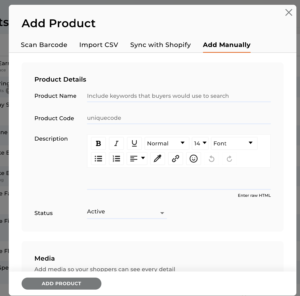
To enter products manually, you’ll start filling out the product information from “Product Name” down.
Product Name
Your product name does not have a limit on the amount of characters. The name can include special characters like spaces, exclamation points, and/or question marks. You don’t have to tell your customers about product names in your live video, but they will see the names in their cart when they add items. Product names will also be seen when using our BuyItLive Streaming overlay or when customers are shopping on your Storefront.
Product Code
Each product has its own unique code. This is the code that customers will comment to add that product to their carts when you do a comment sale. Our system will not let you add a product code that is already being used by another one of your products.
Product codes can be any length of characters and can include special characters like spaces, exclamation points, and question marks. That said, we recommend keeping your product codes short and sweet so customers can easily comment them.
Description
Adding a product description is not required when you create products, however they are nice to have when your customers want to compare products. Customers are able to read the description while looking at products in their carts or while shopping on your Storefront.
We offer a variety of customizations for product descriptions, including raw HTML, different typefaces, font colors, and sizes/orientations.
Status
There are two options for product status. You can choose to have the product be either “Active” or “Inactive”. By selecting “Active”, the product will be added to your storefront and actively available for purchase. Selecting “Inactive” will save your product, but the product will not be added to your storefront or be available for purchase. You can change the product status any time by editing the product.
Product Photos
You will have the option of adding up to 4 photos for each products. You will see this option in the “media” section while you are adding a product.
Price
If the price of your product is a special sale price, make sure to enter both the sale price and the regular price. The special sale price is what we’ll charge customers after indicating how much they’ve saved by shopping your particular sale.
SKU (Stock Keeping Unit)
Adding your SKUs can be helpful for staying organized, but it’s completely optional. Customers never see your Product SKUs. Some store owners opt to use the SKUs as their product codes, especially if they’re importing their inventory from Shopify. You can find out how to do that here.
Inventory Available
This part is pretty straight-forward. Record how much inventory you currently have of that product. You’ll be able to go to your products list and add inventory at any time. Our system will also automatically update your inventory when people buy your products or when you refund and restock an order.
If you have variants for this product, you can add the individual inventory quantities for each variant in the next couple of steps.
Pre-Order
Do you want your product to be available for pre-order? With pre-order, your customers can pay for items that are out of stock to ensure they get one as soon as you add more inventory. Our system will record negative inventory to show when products have been pre-ordered by your paying customers.
To learn more about how customers can buy out-of-stock products, you can check out this article written for shoppers. Our Pre-Order option is only available to BuyItLive Professional sellers.
Variants
You can add variants here if your product has additional sizes, colors, or other options.
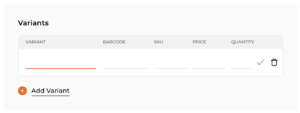
At this time, you are limited to adding one variant type per product. This means that if your product has multiple colors and sizes, you’ll want to create a unique product for each color shirt (for example) and attach variants for the different sizes available for each.
Note that the parent product code + the variant name is what customers will need to comment in order to claim a specific variant, so again less is more. The simpler you can make this, the better.
Shipping
If you’re selling a digital product like tickets or vouchers, you can toggle the “digital” option on here.
If you’re selling a physical product, you have the option to enter the weight of that product. This weight will affect shipping costs if you choose to charge shipping based on weight.
Organization
Collection
Adding a collection to your products can be especially helpful both while creating sales and while setting up your storefront. Before you can select a collection while adding individual products, you’ll need to create any wanted collections first.
To create a collection, click on the “collections” tab in the upper right hand corner of the products page, then click on the orange “+”.
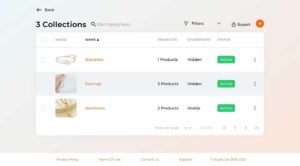
Once you’ve created a collection, you can also add collections to products you’ve already created by going to your products list and clicking the edit button on the far right of each product.
To learn more about this topic, read our support article on Collections.
Product Type
Products Types are one way you can search, filter, and group products. Types are not displayed to customers, but you can use them to organize your products.
Think of types as exactly what the word “type” means. What type of product is it? Is it Clothing or a Toy or perhaps a piece of Equipment.
Try creating a conditional collection that automatically updates to match products with a product type of your choice. Combine types and tags to customize collections even further!
Product Tags
You can add tags to search, filter, and group products. Tags aren’t displayed to customers, but you can use tags to categorize products. Tags are here to help you organize things and make life easier. For example, you may have a NEW item and a VIP item and a Valentine’s day item. You can sort these items with tags.
Try creating a conditional collection that automatically updates to match products with a product tag of your choice.
Save Product
Once you’ve entered the product’s weight and any other information you want to add, click “Save Product” and it will be added to your inventory list. Once you’ve added it, you will be able to scroll up and start over with a new product.
i have tried it all and i cant upload my products
Hey Olga! If you’re still struggling with adding products, you can always reach out to our support team here.
does the customer see other consultants buy it live videos under shop like i am seeing?
Hi Tami, this was the case but the Shop button was recently removed.
Can I use a barcode scanner to add a products?
Hi Vanessa, we currently don’t integrate with any barcode scanning programs, but if you have one that you already use you should be able to create a CSV file with your product information. You can upload a CSV file to BuyItLive to add products.
Soon we will be releasing a QR code scanning feature, but it will be used in conjunction with sales and screen overlays rather than adding products to BuyItLive.
Why can’t I duplicate item??
Hi Sheeso, there isn’t a way to duplicate a product in BuyItLive, but you can easily duplicate them in an Excel or Google sheets files and then upload it as a csv.