It’s time to see what BuyItLive can do! When you’re ready to create a Wall Drop sale, go to your store on BuyItLive and follow these steps to get started.
Selecting Your Page or Group
Before you start setting up your sale, you need to make sure the page or group you’re planning on selling from is connected to BuyItLive. To learn more about this process, read this article.
If you’ve already connected a page or group but are receiving an error message, then you’ve most likely missed a step in the connection process. Check out our article on Fixing an Invalid Connection to see a list of possible reasons for why your connection isn’t valid.
Getting Started

To start setting up your wall drop sale in BuyItLive, log in to your account and go to the home page. Near the top of the screen, you’ll see the options to start either a “Live Sale” or a “Wall Drop.” After selecting “Wall Drop,” you’ll be taken to your sale settings.
Name Your Sale
The name of your sale will allow you to differentiate between your sales. It will be seen on your Facebook post unless you edit the automatically generated description.
Where Will This Sale Be Posted?
Take this moment to verify that you’re posting your sale to the correct Social account and page. If you want to post to a different page, you can select one from within your Social settings.
Will You Be Providing Shipping?
BuyItLive lets store owners choose between providing shipping and requiring customers to pick up their orders, or allow for both. Customers will select the option they want while they’re checking out.
Select Products for Your Sale
Here you decide which products will be included in this sale. Facebook allows us to post 9 photos at a time, so we limit wall drop sales to 9 products.

You can manually scroll and select products from your list of items or search the product names in the search bar. Click on the “Collections” button to scroll through products one collection at a time. As you select products, they will show up in a list directly below. You can also select “Use All Products In This Collection” to add an entire collection to your sale.
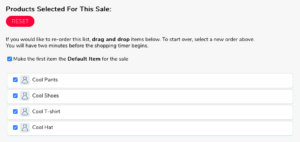
Hit “Reset” to remove all selected products and start over. Click on the check mark next to each added product to remove them one at a time.
If you check the box next to “Make the first item the Default Item for the sale,” then that item will automatically show up in the cart of every customer who clicks on your checkout link.
How Long Should Items Stay In The Checkout Queue?
From here you will be able to set how long items can stay in the checkout queue. The default time is 1 hour, but you can select anywhere between 2 minutes and 5 days. If a shopper’s timer runs out, the products in their cart are removed, giving the next person in line a chance to claim them. Shoppers with an expired shopping cart will receive an email inviting them to “Restore Your Expired Shopping Cart.”
With a live sale, the timer begins once the live video is over. With a wall drop sale, the timer begins once customers click the link to enter their cart.
Other Sale Options
The final section of setting up your sale includes two boxes you choose to check or leave unchecked. You cannot edit this section during a live sale.

Hide This Sale? (Customers Must Have Link)
If you select this option, customers can only access your sale via a direct link. For example: if you’re doing a special sale for a VIP group and don’t want just anyone to shop the sale, selecting this box ensures that won’t happen. While all of your previous sales are generally still available for customers to shop from your Storefront or the “Additional Sales” that appear after a customer initially shops one of your sales, this particular sale will remain private and unavailable through any platform other than a direct link.
Should We Notify Your Customers?
If this box is checked, registered customers will be notified via email when you go live.
What’s next?
Now that you’ve set up your sale, it’s time to post it! Select the “Post Now” button and the page will reload and direct you to a link where you can view the Facebook sale post. With wall drop sales, you can post the sale using the “Post Now” button.
Hi -we @SurroundingsPolishPottery are very excited about this platform . We are wondering if you are incorporating with Mevo camera System witch is IOS . We are using this advice system for our LiveSale to better show product dilate. Also what are the chances to be using our wookommers platform for inventory menu?
Just Facebook messaged your Business page Anna!