The BuyItLive Storefront is available for sellers who subscribe to our Professional plan. Your Storefront is like your own personable website on BuyItLive. You can make certain products available to your customers on the Storefront so that they can come and shop at any time. You can find out how to create your own Storefront here.
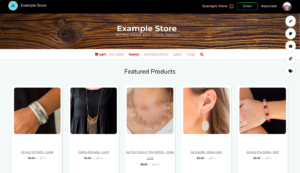
Once you’ve created your Storefront, you can customize it by going to the Tools tab and clicking on “View Storefront.” You’ll see a preview of your Storefront with featured products, a menu bar with buttons to available collections, and 5 edit icons on the right-hand side.
Edit Icon

The first button is the edit icon and lets you customize the words and information shown in your cart and Storefront.
1. Storefront
This toggle allows you to turn your Storefront on and off. You can safely disable your Storefront while still keeping all of your settings/customization. When the Storefront is disabled, shoppers won’t be able to shop from it.
2. Shipping/Pickup Options
This setting is the same as the shipping section of sale setup. You can allow shipping, pickup, or both on your Storefront.
3. Checkout Timer Options
This setting is the same as the cart timer section of sale setup. Your customers’ cart timers can last anywhere between 2 minutes and 24 hours.
4. Guest Checkout
When this is toggled on, anyone who visits your Storefront will have the option to shop as a guest rather than log into Facebook or Google to shop. Once they’re ready to checkout, they’ll need to enter their name and contact information before proceeding.
This is a good setting to have turned on if you know you have customers who don’t have social media or who prefer not to log in via Facebook or Google to shop your Storefront.
5. Cart Header Options
In this section you’re given the option of having your Sales, About, Contact, and Rewards buttons shown in the cart header. Customers see your cart header whenever they enter your store’s home page or cart.
Your About Us page will only be shown on the cart header if you’ve filled it out, otherwise it will not be shown.
6. Product Information
Display Available Quantities: Want your customers to know if inventory is running out? If you enable this setting, then product quantities will display next to each product.
Display Sold Out Products: If you enable this setting, then customers will be able to see products that are currently sold out. They will also be able to waitlist sold out items. For more info on how the waitlist works, read our article on Selling Out of Stock Products.
7. Product Layout
The Storefront defaults to showing 5 products per row. If you enable this setting, it will show 4 products per row instead.
8. Store Subtitle
You can write anything you want here. It will appear underneath your store name when customers view your Storefront.
9. Short Tagline About Your Store
Add a catchy tagline or something you want your customers to see as they are checking out. This text will appear beneath the items in their cart.
10. About Page HTML
When customers are in their cart or your store’s home page, they have the option to click on an “About us” tab — if you have enabled it in your cart header. In this section you can share your story or anything you would like customers to know about your page.
Make sure to hit “Save” after you’ve filled out the things you want from the Edit icon customizations.
Palette Icon

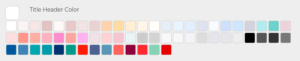
By clicking on the palette icon, you’ll see a list of color options for your cart and Storefront. You can mess around with these colors until you find the perfect fit for your store.
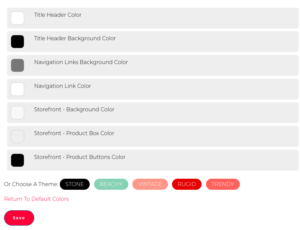
Clicking on any of the color boxes causes other color options to pop up for you to choose from as well.
You also have the option to choose a color theme. These are preset themes that will edit all of the visuals within your cart and Storefront, including the background image.
If you want to return to the default colors you started with, just select that option at the bottom.
Camera Icon

You can click on the camera icon to change your store’s logo and background images. Since your Facebook page should be connected to your BuyItLive store, you can select to simply use the images there for your background image and logo.
You can also upload your own image or select one of our preset background images.
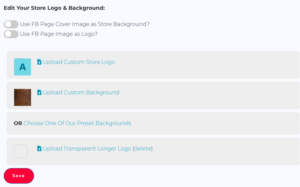
As always, be sure to hit Save once you’re satisfied with the changes you’ve made. Your cart and Storefront update automatically to reflect the customizations you set.
Link Icon

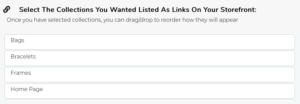
Clicking the link icon will redirect you to the “Edit Storefront” page from your Tools tab. From there you can select which collections you want available on your Storefront.
There are other things you can edit from this page as well. Check out our article on Setting Up Your Storefront to learn more.
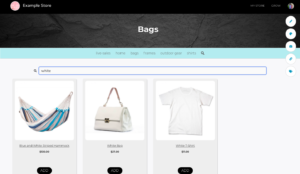
As you add collections to your Storefront, links to each one will appear in your Storefront menu bar. Clicking one of the links will take your customers to an infinite scroll page of only the products that are part of that collection.
![]()
Searching Products
You may also notice in the menu bar that there is a search icon. Customers can click on the magnifying glass to search for products on your Storefront. Even when within a specific collection, searching for a product will search from all of your products available in your Storefront, regardless of collection.
Tag Icon

From here, you can pick and choose which of your products you want available on the home page of your Storefront. If you want to feature certain products, make sure they are part of a collection that is available on your Storefront. Then, you can select to show them here.
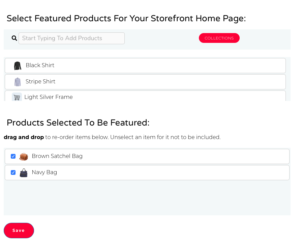
You can drag and drop items to be featured if you want to change the order that they show up. If drag and drop isn’t working for you, try logging in to BuyItLive using a different browser.
Don’t forget to hit SAVE at the bottom when you’ve finished selecting which products you want to feature.